Monday, December 30, 2013

Growing Fodder for your Farm Animals


growing fodder, how to grow fodder, growing barley, alfalfa, oats, fodder for farm animals, cheap way to feed farm animals, frugal farming tips


   As most of you know, we raise goats, chickens, donkeys, and rabbits here on our little homestead. During the summer, our animals forage and graze around for food and we supplement it with grains and sunflower seeds when need be.  In the winter, we used to have to buy a LOT of feed and hay to sustain our animals through the winter.  It quickly becomes quite costly.

    A few months back we decided that we would look into growing fodder for the animals.  We read all we could and decided it was the right path for us.  We have been doing it ever since and we are HOOKED!  Growing fodder is easy, cheap and takes up a minimal amount of space.  How cheap is it?  Well, a 50 lb. bag of grain will grow into 300 lbs. of fodder.  Yes, you read that right.  50 lb. becomes 300 lbs.  You save money and your animals will LOVE it.  They go crazy when they see us coming with it.

     When you decide to grow fodder, you have a variety of grains to choose from.  The most popular that are used are barley, oats, or alfalfa.  I know people have also used corn and wheat with success too.  One note, if you buy oats, just buy whole oats.  Crimped or rolled oats will NOT work.   Just go to your local feed store to buy the grains.

    Most people start off with barley because it is the easiest to grow.  We started out with oats because our local feed store does not carry barley.  We have grown alfalfa, oats and barley now and they all do fine.  Barley does grow the quickest and thickest but our animals seem to prefer the oats.  We grow oats for 2 weeks, then switch to barley for a week, then to alfalfa and repeat the cycle. Do what works best for you and your animals.   Oats are really good for goats and donkeys digestion.  It has great rumen fermentation and is a rich source of protein and it is high in fiber.

     My husband built my shelves out of scrap lumber and welded wire we had laying around.

growing fodder, how to grow fodder, growing barley, alfalfa, oats, fodder for farm animals, cheap way to feed farm animals, frugal farming tips
The shelf my hubby made for our fodder system.

        The trays I purchased from a dollar store. They are just cheap, aluminum roasting pans that you usually use and throw away.  The size I bought are 15 1/2" x 12" x 2 1/2".  We purchased 14 of these because I like to "harvest" two a day to feed the animals.  Hubby drilled a lot of holes in each pan and I was ready to start.

     On the first day, soak your grains in a bucket of water for 8-12 hours.  Cover the grains with about 2" of water.  I generally soak mine right before I go to sleep so they are ready when I am the next day.
    On the second day, rinse the seeds well and then rinse them some more.  Now, pour the rinsed grains into your tray(s) and place on the top shelf.  You want the grains to cover the bottom of the tray but be no more than 1/2" deep.  Again, I "harvest" two trays a day so I have 14 trays with 2 trays for each one of my 7 shelves.  Be sure to soak seeds for tomorrow.

     On the third day, move the tray(s) from the top shelf and move to the second shelf.  Take the grains you soaked and rinse them and put them in trays and they go on the top shelf.  Each day you will do this and lower the trays down a shelf.  You will need to water these trays about twice a day.  You water the top shelf and the water runs through each shelf to water the ones down below.  Just be sure the water drains out well. They need to be moist but not soggy or else mold will grow and you don't want that. Do not forget to have some kind of tray on the very bottom to catch the draining water or you'll have a big mess.  :-)

   Remember, to have fodder every day, you must start a new batch soaking every day.  It takes a week (for barley) or 10 days (for oats and alfalfa) to begin with but the nutritional value of fodder is so much greater than grain alone.

   You can "harvest" it at any time but I do mine anywhere from 7-10 days depending on the grain I am growing.  By this point, the greens are about 6"-8" tall and there is a nice root mat also.  The fodder is easy to work with at this point also.  Just pick it up in one big piece or tear it up and feed the animals.  The animals will be almost salivating when they see you coming.  How they enjoy the seeds, greens, and roots so much more than just plain grains and the digestibility is so much better that they eat less too.  Another bonus of fodder is it takes no fertilizer, no soil, no special knowledge. That's right.  It only uses water and sunlight to grow.  Amazing!

     With winter time, we place 4' plant lights on each end of our shelves to help the fodder grow better.  We have had great success with this method.

growing fodder, how to grow fodder, growing barley, alfalfa, oats, fodder for farm animals, cheap way to feed farm animals, frugal farming tips
Isn't this oat fodder beautiful?!

Follow me on Pinterest
Follow us on Facebook
Follow us on Twitter
Follow us on g+
Follow us on linkedin
Follow our Youtube channel
Follow me on Instagram 

Sunday, December 29, 2013

The Year in Review: 2013 on Countrified Hicks

   Two thousand and thirteen has been a great year for my blog and all of it social media connections.  On Facebook, we reached 5000 fans and the blog itself has had visits from over 134 different countries this year!  Amazing, isn't it?! And this post is my 200th post of the blog so lots of milestones are being made or met.
Here are some Top 10 lists from 2013.

Top 10 Visiting Countries

  1. United States
  2. Canada
  3. Germany
  4. Russia
  5. Poland
  6. France
  7. United Kingdom
  8. Australia
  9. Iran
  10. Latvia

Top 10 Most Viewed Recipes


Top 10 Most Viewed Frugal Living Posts

  1. Frugal Living:  How a family of 4 live off $1300 a month (over 57,000 page views this year)
  2. Homemade Fabric Softener recipe
  3. Cheap flea killer for dogs
  4. How we do laundry in the country
  5. Homemade laundry detergent
  6. Frugal living:  Waste Not
  7. How to make instant oatmeal packets
  8. How to save money
  9. Homemade Play-Doh
  10. Frugal Living Video Blog #2:  Don't waste nothin'

    What was your favorite post of mine this year?  If a post does not look familiar to you, I encourage you to go read it and see why my followers liked it so much.   Also, on the top right is a place you can sign up for my posts to come directly to your email so you never miss a post.  I encourage you to do so.  
Thank you for a great year!


Follow us on Facebook

Follow us on Twitter

Saturday, December 28, 2013

Chicken a la King Recipe

   Chicken a'la King is one of those dishes that I think counts as a comfort food.  A food that makes you feel warm & cozy and makes you think of the good ole days.  Of course, that just may be me too. 


Chicken a'la King
 
 4 chicken breasts
1 1/2 c. milk
1/2 c. flour
1/4 c. chopped pimentos
1 can peas
1 can chicken broth 
1 small can mushrooms 
1 green pepper, sliced or diced
1 stick of butter
2 T. cornstarch
1 T. parsley flakes
2 tsp. chives
1 tsp. salt
1/4 tsp. pepper


   Boil the chicken and then shred it or just use canned chicken.  Melt the butter in a skillet and cook the green peppers.  Stir in the flour, salt & pepper.  When it is nice and hot, stir in the milk, broth, peas and crumbled up bouillon cube.  Boil for one minute and stir in the pimentos, chives, parsley, mushrooms, chicken and cornstarch.  

Chicken ala king, Chicken a la King, chicken à la King recipe, comfort food, country style recipes,
I just used some of my dehydrated mushrooms and chives instead.

  If the liquid is not hot enough, the cornstarch will not thicken the sauce.  Stir well and remove from heat.  Let it thicken for 5 minutes and then serve over hot biscuits, toast or egg noodles.  We prefer to eat it over homemade biscuits


Follow us on Pinterest
Follow us on Twitter
Follow our Youtube Channel
Follow us on Instagram


Friday, December 27, 2013

Farm Animals

   I was out walking around our property recently and was enjoying visiting with the farm animals.  They each have their own personality and I never get tired of looking at them or taking their picture.  If this is not your thing, just skip today's post and I'll see you tomorrow.  :-)

Blue Silkie, Boer nanny goat, mammoth donkey, tufted duck, video of rooster crowing, country living, backyard chickens, melody extreme cheapskate,
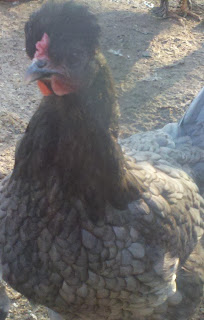
Our blue Cochin chicken

Blue Silkie, Boer nanny goat, mammoth donkey, tufted duck, video of rooster crowing, country living, backyard chickens, melody extreme cheapskate,
Our nanny Boer goat.

Blue Silkie, Boer nanny goat, mammoth donkey, tufted duck, video of rooster crowing, country living, backyard chickens, melody extreme cheapskate,
Jasper

Blue Silkie, Boer nanny goat, mammoth donkey, tufted duck, video of rooster crowing, country living, backyard chickens, melody extreme cheapskate,
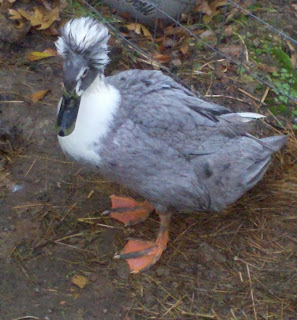
Mozart, our tufted duck

Blue Silkie, Boer nanny goat, mammoth donkey, tufted duck, video of rooster crowing, country living, backyard chickens, melody extreme cheapskate,
Don't you just love his pompadour and his coloring?!

Blue Silkie, Boer nanny goat, mammoth donkey, tufted duck, video of rooster crowing, country living, backyard chickens, melody extreme cheapskate,
Sheera, our guard dog.  We love her so much and she is so protective of our family.

Blue Silkie, Boer nanny goat, mammoth donkey, tufted duck, video of rooster crowing, country living, backyard chickens, melody extreme cheapskate,
She is a mixed breed.  Her father was a  Polish rooster and her mother  was the blue Cochin.

Blue Silkie, Boer nanny goat, mammoth donkey, tufted duck, video of rooster crowing, country living, backyard chickens, melody extreme cheapskate,
"Y"...well just because.  (lol)

Blue Silkie, Boer nanny goat, mammoth donkey, tufted duck, video of rooster crowing, country living, backyard chickens, melody extreme cheapskate,
The woods are still pretty in the winter time. 


Rooster crowing and duck quacking


Just our rooster looking around


Follow us on Facebook
Follow us on Twitter
Follow us on Pinterest


Wednesday, December 25, 2013

Merry Christmas!

   I just wanted to take a moment and tell each of you "Merry Christmas".  I cannot convey how much each of you mean to me.  I pray God blesses you all today and over the span of the next year.

Merry Christmas, Countrified Hicks, Melody Rose Extreme Cheapskate, pioneer living blog, a pioneer woman
Ron, Melody (me), Ronny, and Bub!


Follow us on Facebook

Follow us on Twitter

Follow us on Pinterest

Tuesday, December 24, 2013

Classic Sugar Cookies

   Everyone likes a good sugar cookie and this is the recipe we always use.  These turn out really soft and are quite tasty.

angel cookies, Christmas cookies, Christmas tree cookies, Classic sugar cookie

Classic Sugar Cookie

                     3 c. flour                               1/2 tsp. salt
                     1 tsp. baking powder            2 sticks butter
                     2 eggs                                   1 1/2 c. sugar
                     2 tsp. vanilla

   Sift the baking powder, salt, and flour together and set aside.  Cream the butter and sugar together until fluffy and then beat in the eggs, one at a time.  Now, blend in the flour mixture.  Cover the bowl and put in the refrigerate to chill for a minimum of 2 hours. 

     After the dough is chilled, preheat the oven to 350 degrees.   Roll out your dough onto a floured surface about 1/4" thick.  If you roll out the dough too thinly, the cookies will be crisp and not soft.  Cut out cookies with cookie cutters.  Bake for 8 1/2 minutes.  You know they are done when the centers are no longer wet.  Do not overcook.  Decorate or frost as desired.


angel cookies, Christmas cookies, Christmas tree cookies, Classic sugar cookie


Follow us on Pinterest
Follow us on Twitter
Follow our Youtube Channel
Follow us on Instagram

Easy Mexican Wedding Cookies

    Mexican wedding cookies are simple to make and are a great light tasting little cookie.  You may not know these cookies by name, but once you see them, I'm sure you'll recognize them.


cookies to serve at weddings, light cookie for holidays, Mexican wedding cookies


Mexican Wedding Cookies

2 sticks butter, softened
2 tsp. vanilla
2 c. flour
1 c. powdered sugar
1 c. chopped walnuts

    Preheat the oven to 350 degrees.  Beat the butter, 1/2 c. of the powdered sugar and vanilla together.  Add in the flour and walnuts.  Shape into 1" balls and place on a cookie sheet and bake for 14 minutes.  When they are done, roll them in the remainder of the powdered sugar.  

cookies to serve at weddings, light cookie for holidays, Mexican wedding cookies


Follow us on Pinterest
Follow us on Twitter
Follow our Youtube Channel
Follow us on Instagram

Grinch Cookies

   Grinch cookies are colorful and the kids go crazy for them and they taste amazing!

cookies for Christmas, Grinch cookies, how the grinch stole Christmas


Grinch Cookies

Butter pecan cake mix
6 T. butter
2 eggs
1 tsp. cornstarch
green food coloring

    Preheat the oven to 375 degrees.  In a small bowl, mix the cornstarch and powdered sugar together and then set aside.  In a mixing bowl, mix the cake mix, butter, and eggs together until well blended.  Stir in the food coloring.  I used 12 drops but use how many you want to get the shade of green you desire.  
    Now, drop blobs of the cookie dough into the powdered sugar.  It may look like it will not work at this point but just go ahead and plop a big spoonful in and try it.


cookies for Christmas, Grinch cookies, how the grinch stole Christmas

 Coat the dough blob well and then place on a cookie sheet.  Place them a bit a part because they well spread out.  Bake for 8 1/2 minutes.


cookies for Christmas, Grinch cookies, how the grinch stole Christmas


Other cookie recipes I know you will love include:  my No Bake Cookie recipe and my Classic Sugar cookie recipe.  


Follow us on Pinterest
Follow us on Twitter
Follow our Youtube Channel
Follow us on Instagram


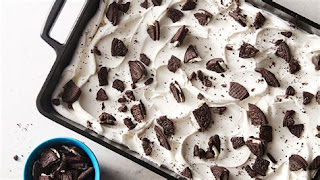
Dirty Snow Cake

   The Dirty snow cake is a kid's favorite.  It tastes really good and it looks just like dirty snow.  It is generally a hit at Christmas parties.


Dirty Snow Cake

Box of white cake mix
chocolate sandwich cookies (like Oreos)
milk
butter
eggs
1/4 tsp. salt
1 tsp. vanilla
1/4 c. flour
1/2 tsp. lemon juice

    Mix up the cake according to directions but in place of the water use an equal amount of milk; instead of oil, use an equal amount of butter and use one more egg than the recipe calls for.  Making these changes makes the cake taste more like you would find in a bakery instead of just a boxed cake taste.   
 
     Once the mix is blended, stir in the flour, salt, vanilla and lemon juice.  Most boxed cake mixes are too sweet and these ingredients help to offset this and again, just makes a better cake.  
 
    Crush up 1 c. of sandwich cookies and gently fold into the batter.  Pour the batter into a cake pan and bake according to the box directions.  
 
    Once the cake is cool, frost it with white frosting and then crumble up some more cookies and sprinkle on top.  

                                 
             Other fantastic recipes that I make with Oreos include Oreo Fluff, Air Fryer Oreos and Oreo Dump Cake!     


Follow us on Pinterest
Follow us on Twitter
Follow our Youtube Channel
Follow us on Instagram


I shared this recipe with the following blogs:
Hope in Every Season

Pecan Pie Bars

  If you love pecan pie, this recipe is for you.  It is not as sweet as a pecan pie but equally as good and serves more. 

Christmas desserts, pecan pie bars, Yummy Christmas recipes


Pecan Pie Bars

     For the crust:

         2 c. flour            
        1/2 c. powdered sugar
        1 c. butter

     Mix the crust ingredients together and then pat them into a 9" x 13" cake pan. Bake in a preheated oven at 350 degrees for 15 minutes.

         THEN

     For the filling:  
    `   1/2 c. sugar
        3 eggs
        1 c. light corn syrup
        1 tsp. vanilla
        2 c. pecans
        1/2 tsp. salt

      Mix the filling together and then pour over the cooked crust and bake at 350 degrees for 30 minutes.  Remove from heat, let cool and then cut into bars.

pecan pie bars, Yummy Christmas recipes, Christmas desserts


I make an excellent Chocolate Chip Cookie Bars too!  Check it out!


Follow us on Pinterest
Follow us on Twitter
Follow our Youtube Channel
Follow us on Instagram

Cheerio Candy Recipe

    Cheerio candy is a great and easy candy to make for Christmas time or anytime.  It is a family favorite. 


Cheerio Candy

                            2 pkgs. semi-sweet chocolate chips 
1 c. creamy peanut butter
4 c. Cheerio cereal
2 c. mini marshmallows

     In a large bowl, pour in the cereal and marshmallows.


Cheerio candy, candy made with cereal, easy Christmas candy


Measure up the peanut butter and set aside.

Melt the chocolate chips in a clean, DRY bowl in the microwave in 30 second intervals.  Stir every 30 seconds until they are completely melted.  As soon as they are ready, immediately stir in the peanut butter.  When blended together, pour over the cereal mixture and stir well.  Drop by spoonfuls onto wax paper and let set.

Cheerio candy, candy made with cereal, easy Christmas candy


Another good candy recipe I have shared are my Old Fashioned Potato Candy, Root Beer Float Fudge,
and Homemade Reeses!


Follow us on Pinterest
Follow us on Twitter
Follow our Youtube Channel
Follow us on Instagram


Friday, December 20, 2013

Animals in the Fall

   I just went out visiting the animals on and around our farm today and wanted to share with you what I saw.

Phoenix chicken, Silver laced wyandotte, golden laced, Mammoth donkey, nanny boer goat, farm life pictures, tufted duck, Rhode Island Red,
This is our nanny Boer goat.  

Phoenix chicken, Silver laced wyandotte, golden laced, Mammoth donkey, nanny boer goat, farm life pictures, tufted duck, Rhode Island Red,
Minnie and Jasper (our resident donkeys) coming to greet me.  Minnie is Jasper's momma.

Phoenix chicken, Silver laced wyandotte, golden laced, Mammoth donkey, nanny boer goat, farm life pictures, tufted duck, Rhode Island Red,
Minnie.


Phoenix chicken, Silver laced wyandotte, golden laced, Mammoth donkey, nanny boer goat, farm life pictures, tufted duck, Rhode Island Red,
Minnie doesn't understand personal space.  ;-)

Phoenix chicken, Silver laced wyandotte, golden laced, Mammoth donkey, nanny boer goat, farm life pictures, tufted duck, Rhode Island Red,
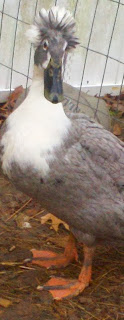
Mozart our tufted duck.  

Phoenix chicken, Silver laced wyandotte, golden laced, Mammoth donkey, nanny boer goat, farm life pictures, tufted duck, Rhode Island Red,
Mozart (I'm sure you see why he has that name).  

Phoenix chicken, Silver laced wyandotte, golden laced, Mammoth donkey, nanny boer goat, farm life pictures, tufted duck, Rhode Island Red,
Our big Rhode Island Red rooster. 

Phoenix chicken, Silver laced wyandotte, golden laced, Mammoth donkey, nanny boer goat, farm life pictures, tufted duck, Rhode Island Red,
Our Silver Laced Wyandotte rooster.

Phoenix chicken, Silver laced wyandotte, golden laced, Mammoth donkey, nanny boer goat, farm life pictures, tufted duck, Rhode Island Red,
This is our Silver laced Phoenix and his mates that are golden laced Phoenix breed.

Phoenix chicken, Silver laced wyandotte, golden laced, Mammoth donkey, nanny boer goat, farm life pictures, tufted duck, Rhode Island Red,
Sheera, our resident guard dog. 
   Thank you for letting us share our life on the farm and a few of the animals that live here with us.


Follow us on Facebook

Follow us on Twitter

Follow us on Pinterest


Other blogs you may like:
Create with Joy

How to Make a Classic Christmas Rainbow Poke Cake

            This recipe has been around for a LONG time and to me, it never goes out of style.   It is colorful, festive, moist and utterl...