Monday, September 30, 2013

Making your own Powdered Eggs

     We have our own chickens and get lots of fresh and delicious eggs from them.  At times, we get more eggs than we can eat.  One way we preserve these extra eggs is by dehydrating them and making them into powdered eggs.  Powdered eggs can be stored properly for up to 10 years.


   There are 2 methods to dehydrating the eggs to make powdered eggs.  The first way is to use raw, whipped eggs and just dehydrate them.  This is the way that I do my eggs.   I have tried both methods but eggs that start out using the raw eggs taste better and reconstitute better than the cooked method.

   Method 2  is to cook the eggs first and then dehydrate them.  All you do to begin is to crack open 6 farm fresh eggs into a bowl.

dehydrating eggs, making your own powdered eggs, how to make powdered eggs, preserving eggs, preserving food with dehydration
6 farm, fresh eggs cracked open in a bowl.


Whip the eggs thoroughly.

dehydrating eggs, making your own powdered eggs, how to make powdered eggs, preserving eggs, preserving food with dehydration
The whipped eggs ready to go into the skillet.


 For method 1, just pour onto trays and began dehydrating them.   It takes about 12-14 hours to get them thoroughly dry.   For Method 2, scramble them up in a skillet.  I used a cast iron skillet to eliminate the usage of oil but if you use a regular skillet, use as little amount of oil or butter possible. 
 
dehydrating eggs, making your own powdered eggs, how to make powdered eggs, preserving eggs, preserving food with dehydration
Scrambled eggs.
  Now take the scrambled eggs and place on a tray and place it in your dehydrator.
dehydrating eggs, how to make powdered eggs, making your own powdered eggs, preserving eggs, preserving food with dehydration


  My dehydrator only has one temperature but if your dehydrator has different settings, I would recommend about 145 degrees.  Leave the eggs dehydrating for about 5 hours or until they are dry and hard.  

  For both methods:  Once the eggs are dried, put the dehydrated eggs into a food processor or blender and blend them up until they are powdery.  Store them in a mason jar until needed. Or to make them last even longer, seal them up in an airtight container.  They can last up to 10 years this way.

     To reconstitute, just use 1 heaping tablespoon of powdered eggs mixed with 2 tablespoons of water; stir well and let it set for five minutes.  This equals to one regular egg.

    I use these powdered eggs by making omelets, scrambled eggs or use in baking recipes.  It is a great way to preserve eggs for future use. 

dehydrating eggs, making your own powdered eggs, how to make powdered eggs, preserving eggs, preserving food with dehydration

 
Follow us on Pinterest
Follow us on Twitter
Follow our Youtube Channel
Follow us on Instagram
 

Thursday, September 19, 2013

GIVEAWAY: 3 Schrade Tactical Knives

    As promised, we have teamed up with Schrade to giveaway 3 Schrade SCHF2SM tactical knives.  That's right, there will be a total of 3 winners who each will win one of these super, nice knives.  Here is the review we did of the knife.  We LOVE ours!


Schrade SCHF2SM, Old Timer knives, Schrade tactical knife, Givaway, survival knife


a Rafflecopter giveaway

The winners of the giveaway are:  Donald W. (gmail email account) with entry #80; Stephanie L. (aol email account) with entry #1147; Brandon W. (hushmail email account) with entry #4415.  Each person has won one of the beautiful knives.  I have emailed each of you.  Please respond with your contact information. 

Wednesday, September 18, 2013

Schrade Tactical Knife Review

    
Schrade knife, Schrade, Old Timer knives, Tactical knife review, SCHF2SM,

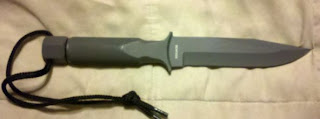
We recently had the opportunity to review the Schrade SCHF2SM tactical knife.   On initial inspection, you can see that the knife is all one piece but the handle is hollow. 
Schrade knife, Schrade, Old Timer knives, Tactical knife review, SCHF2SM,

 This concerned my husband at first but this is a fine piece of craftsmanship.  The knife had a nice sharp blade straight out of the box.   The knife is not flimsy and the overall feel of the knife is solid.  It is made of carbon steel.  The end is water proof and hollow and comes with a screwdriver bit set in the end.

Schrade knife, Schrade, Old Timer knives, Tactical knife review, SCHF2SM,
 While the screwdriver bits  could be useful, we decided to remove the set and put in some survival items instead.  For instance, we some fishing line, a fish hook, a few waterproof matches, and a piece of flint in the end instead.
   
      We got the knife and my hubby put the knife to the test.  He cut down brush and small trees; he butchered game with it; and he even used the blade to pry open a wedged door.  The knife stood up to the test.  The knife also came with a nice belt sheath that has a removable pouch (to hold a whetstone) and a lanyard.
Schrade knife, Schrade, Old Timer knives, Tactical knife review, SCHF2SM,

 The sheath is versatile enough that you can attach it to virtually any kind of belt, pack or anything.  The sheath also has a leg string.  We really liked this knife by Schrade and would highly recommend it to anyone!


Schrade knife, Schrade, Old Timer knives, Tactical knife review, SCHF2SM,

  You can find Schrade on Facebook or on their website!


And because SCHRADE is so wonderful, they have agreed to let us GIVEAWAY three of these knives.  Stay tuned because tomorrow THURSDAY, SEPTEMBER 19th, the giveaway begins!

Enter the GIVEAWAY!

Friday, September 13, 2013

S15 Olight Baton Flashlight Review

   We recently had the privilege of reviewing a flashlight from Olight World.  The company graciously sent us one of their "baton" style flashlights, the "S15".  It is a rather small flashlight and to be honest, we were hesitant to believe that something that small could do much good.  Boy were we SURPRISED!  This flashlight is AMAZING! 


S15, Olight World flashlight, bright compact flashlight
S15 flashlight with one battery installed.

  The amount of light this little flashlight puts out will blow your mind.  We live in the country with no city lights to be seen.  When we go outside it is DARK.  Standing on our porch, when it is late at night, we can barely see in front of our faces.  We shined this light out into the woods and could see 75 yards through the trees easily.  IT LIT IT UP! 
    My husband served with the USMC and is a natural outdoorsman.  He tried it out the light and loved it.  He kept remarking about not only the brightness of the light but how sturdy it was built also.  He really liked the extender tube that was included so he could put 2 AA batteries in instead of just 1.  The light was just as bright with one battery but battery life is extended with the use of two.

S15, Olight World flashlight, bright compact flashlight
The S15 flashlight with the extender tube attached and 2 batteries installed.
  

 It even has a flat end with a nice strong magnet on the end.  It's also waterproof  and has a moonlight mode!  Too cool!  Bad points?  NONE!  Would we recommend it?  HIGHLY!
    Find Olight World on Facebook or their home page and tell them you heard about them from Countrified Hicks!

Tuesday, September 10, 2013

Homemade Steak Sauce


     Today I am going to share a delicious recipe with you "Homemade Steak Sauce".  I know you're thinking to yourself "she can't afford steak" and you'd be right.  ;-)   But I have a recipe for some anyway and canned four jars full today.  By the way, my steak sauce tastes similar to the "57 variety" kind of sauce.

Homemade Steak Sauce
 
2 c. ketchup
3/4 c. Worcestershire sauce
1/2 c. water
1/2 c. lemon juice
1/2 c. white vinegar
4 T. brown sugar
2 T. Teriyaki sauce
2 T. yellow mustard
2 tsp. garlic powder


    Combine all ingredients in a pot and bring to a gentle boil.  Once it boils, turn to simmer and let it simmer 30 minutes.  Transfer the sauce to hot, sterilized jars and water bath process them for 15 minutes.  Makes enough to fill 4 half-pint jars.

homemade steak sauce, how to make sauces and condiments
      
If you liked this recipe, check out my recipes for Tangy BBQ Sauce and Homemade Spaghetti Sauce.
 
Follow me on Youtube
Follow me on Instagram 
Follow me on Pinterest
Follow me on Twitter


Monday, September 9, 2013

Homemade Taco Seasoning

    One way I like to save money is by making a lot of my own "seasonings" and sauces instead of buying them.  Taco Seasoning is a great example.  I can make up a pint jar full of mix for less than $1.00 and it equals the amount of about 16 envelopes of store-bought taco seasoning.  The cost comparison alone should make you want to try it.


homemade taco seasoning, how to make your own seasonings, frugal living tips,
   As you can see from my jar, you use 2 tablespoons of my mix to equal one store-bought envelope of taco seasoning.


Taco Seasoning

 1 c. chili powder
1/2 c. onion powder
1/4 c. plus 2 T. cumin
2 T. garlic powder
2 T. paprika
2 T. salt

Mix all ingredients together and store.  We put ours in a pint canning jar and it works great.
 
To use, mix together 2 tablespoons of taco seasoning with 1/2 cup of water. 
 
 
Be sure to check out my Homemade Taco Sauce too.

You might also like my Kale Pestomy Greek Spice Blend, and my Sweet Cinnamon Butter!


Follow us on Pinterest
Follow us on Twitter
Follow our Youtube Channel
Follow us on Instagram
 

Chicken Waterer Giveaway

  Come enter for your chance to win a BriteTap combo Pack.  The combo pack consists of a BriteTap waterer and 2-Gallon insulated supply tank.  It's a retail value of $69.95 + $19 in shipping.  As an added bonus, when you "like" the Chicken Waterer on Facebook, you will get a 10% discount on merchandise sold on their Facebook page store.  Just  click the "Shop Now" store button on the top of their page and you'll  be taken to a place where you can purchase products while on facebook.  Now, just scroll down to enter via Rafflecopter!

giveaway, blog giveaway, Chicken Waterer, Brite Tap,
The BriteTap Chicken Waterer

giveaway, blog giveaway, Chicken Waterer, Brite Tap,
A chicken getting a drink from the waterer
a Rafflecopter giveaway


Sunday, September 8, 2013

Dehydrating Acorn Squash

   Another vegetable we had an abundance of from our garden this year was Acorn Squash.  And as you can tell from my posts, my favorite way of preserving is by dehydration.  Today, I am dehydrating acorn squash.
   Acorn squash is very tasty and sweet tasting.  It contains no fat; it is low calorie; and just 1/2 cup provides 18% of your daily recommended amount of fiber and 20% of your daily recommended amount of Vitamin C.
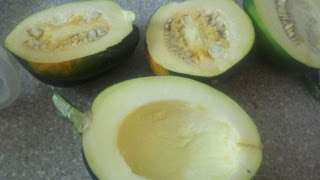
     To dehydrate acorn squash, just wash it and then cut it in half.

acorn squash, what to do with acorn squash, dehydrating vegetables, garden harvest,

Then, scoop out the seeds and place the squash on a baking sheet and cover with foil.  Place them in a 350 degree preheated oven for 30 minutes.  Remove from the oven and let them cool.  Once they are cool, remove the skin and cut the squash into 1/2"-3/4" squares.  Dehydrate in your dehydrator for 12 hours.

acorn squash, what to do with acorn squash, dehydrating vegetables, garden harvest,
The dehydrated acorn squash.

     To use, soak the squash in really hot water for 15-30 minutes and then throw them into a soup, casserole or stew.  You can also mash them up or roast them.  Also, acorn squash seeds can be toasted and eaten.
 
        I also have dehydrated Yellow Squash and made up some Butternut Squash Chips so be sure to check them out.


 Follow us on Facebook
Follow me on Pinterest
Follow us on Twitter
Follow us on g+
Follow our Youtube channel
Follow me on Instagram 


I shared this post with the following blogs:

Create with Joy 
The Chicken Chick

Saturday, September 7, 2013

Canning Apple Pie Filling

   We had about 4 lbs. of apples given to us recently.  We have apple trees but they are young and are not bearing fruit yet (except for our crab apple trees).  Anyway, I decided to make up some apple pie filling and can it.  Here is how I did it:


Apple Pie Filling
 
 3-4 lbs. apples
10 c. water
4 1/2 c. sugar
1 c. cornstarch
3 T. lemon juice
1 T. + 1 1/2 tsp. cinnamon
2 tsp. salt
1 tsp. nutmeg
1 tsp. cloves


canning apple pie filling, preserving food, how to can apple pie filling, what to do with apples, how to make an apple pie

      Wash, peel, core and slice your apples.  Place in a bowl of water and set aside.  Take all other ingredients and stir them together in a large pot.  Bring to a boil and then turn the stove to medium heat and cook until the mixture becomes thick and bubbly.  
 
      Now, take the apple slices and pack them into hot, sterilized quart sized jar.  Then, pour the hot syrup over the apples.  Take a knife and run down inside the jars and around to remove all air bubbles and to be sure the syrup gets all the way down to the bottom.  Fill each jar this way.  Seal and process via water bath process for 20 minutes.  This will make 4 one quart jars.        


    Be sure to use my Extra Flaky Never-Fail Pie Crust.


       This apple pie filling goes great in my Crock Pot Apple Dump Cake or my Southern Fried Hand Pies recipe.


Follow us on Pinterest
Follow us on Twitter
Follow our Youtube Channel
Follow us on Instagram

How to Make a Classic Christmas Rainbow Poke Cake

            This recipe has been around for a LONG time and to me, it never goes out of style.   It is colorful, festive, moist and utterl...