Anytime that I cook a turkey, I save the carcass to use again to make turkey stock.
The first thing you need to make turkey stock is a whole turkey carcass. After Thanksgiving, we saved ours so I could make stock. Get a really large soup pot and add the turkey carcass and water. This was a really large turkey so I added 2 full gallons of water to the pot so the bones and all were completely covered in water. I then added 1/2 cup of vinegar. The vinegar helps to draw out all of the nutrients out of the bones. Allowing the vinegar to do the work of softening the bones makes the stock so much more mineral rich. It leaches out magnesium, calcium, and potassium! Soak for about an hour.
Now the fun part, add in the veggies and herbs you desire. I often will save the ends off of carrots and celery and throw them in the freezer until I have enough for stock. If I buy an onion and don't use it all, it goes into the bowl for stock too. Any veggies you have on hand or want to buy can go into the pot. I always add in celery, onions and carrots and then whatever else I feel like at the time. Today I added in 1 large onion, cut in half; 4 stalks of celery (cut in 1 1/2"-2" pieces); 3 leeks cut up into large sections; a small handful of mushrooms; and a 1/2 bag of baby carrots I had in the fridge. At this point add in some spices too. I added in parsley flakes, sage, garlic powder, salt & pepper. Sometimes I add in thyme but I was out of it today.

Turn the stove onto high and bring the mixture to a boil. Skim off any foam that is on the top and discard. Turn the stove down. We have an electric stove and turned it down between 1 and 2. Cover the pot and allow to simmer 12-24 hours. We let ours go overnight.
Remove from the stove and using tongs, remove the bones and discard. Now use a fine mesh colander, strain the veggies out. I feed the veggies to the turkeys and chickens. They love them. At this point, I place the strained stock into the fridge. I leave it there all day and night. The next day, I scoop all the fat that is congealed at the top. If you have a carcass from a home raised bird, you can leave the fat in it if you want. Some leave it and some remove it. They say there is good immune building nutrients in the fat so it is a matter of preference.
Now you can freeze or refrigerate the stock or can it. If you put it in the refrigerator, it will last 5-7 days. In the freezer, it will last a year. If you pressure can it, it can last at least 3 years on your pantry shelf. It tastes so wonderful I doubt it will be there that long before you use it up. :-)
First, sterilize your jars. Wash your jars and bands thoroughly. I then place mine on a cookie sheet in a warmed oven until ready to use (at least 30 minutes). I then bring my stock to a slow boil and pour them into the sanitized jars. Fill with hot broth and leave a 1" head space. Wipe the rims with a clean dishtowel soaked with vinegar and then put on a new lid. Tighten according to manufacturer's recommendations. At this point you are ready to can them. Process following your pressure canner's instructions. I pressure canned this stock at 11 pounds of pressure for 25 minutes and made 5 quarts of delicious turkey stock. Mark and date your jars and you are finished.
A few notes:
 |
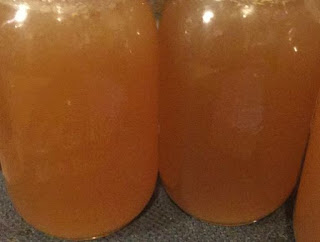
| Don't you love the rich, dark color of homemade stock? |
The first thing you need to make turkey stock is a whole turkey carcass. After Thanksgiving, we saved ours so I could make stock. Get a really large soup pot and add the turkey carcass and water. This was a really large turkey so I added 2 full gallons of water to the pot so the bones and all were completely covered in water. I then added 1/2 cup of vinegar. The vinegar helps to draw out all of the nutrients out of the bones. Allowing the vinegar to do the work of softening the bones makes the stock so much more mineral rich. It leaches out magnesium, calcium, and potassium! Soak for about an hour.
Now the fun part, add in the veggies and herbs you desire. I often will save the ends off of carrots and celery and throw them in the freezer until I have enough for stock. If I buy an onion and don't use it all, it goes into the bowl for stock too. Any veggies you have on hand or want to buy can go into the pot. I always add in celery, onions and carrots and then whatever else I feel like at the time. Today I added in 1 large onion, cut in half; 4 stalks of celery (cut in 1 1/2"-2" pieces); 3 leeks cut up into large sections; a small handful of mushrooms; and a 1/2 bag of baby carrots I had in the fridge. At this point add in some spices too. I added in parsley flakes, sage, garlic powder, salt & pepper. Sometimes I add in thyme but I was out of it today.

Turn the stove onto high and bring the mixture to a boil. Skim off any foam that is on the top and discard. Turn the stove down. We have an electric stove and turned it down between 1 and 2. Cover the pot and allow to simmer 12-24 hours. We let ours go overnight.
Remove from the stove and using tongs, remove the bones and discard. Now use a fine mesh colander, strain the veggies out. I feed the veggies to the turkeys and chickens. They love them. At this point, I place the strained stock into the fridge. I leave it there all day and night. The next day, I scoop all the fat that is congealed at the top. If you have a carcass from a home raised bird, you can leave the fat in it if you want. Some leave it and some remove it. They say there is good immune building nutrients in the fat so it is a matter of preference.
Now you can freeze or refrigerate the stock or can it. If you put it in the refrigerator, it will last 5-7 days. In the freezer, it will last a year. If you pressure can it, it can last at least 3 years on your pantry shelf. It tastes so wonderful I doubt it will be there that long before you use it up. :-)
First, sterilize your jars. Wash your jars and bands thoroughly. I then place mine on a cookie sheet in a warmed oven until ready to use (at least 30 minutes). I then bring my stock to a slow boil and pour them into the sanitized jars. Fill with hot broth and leave a 1" head space. Wipe the rims with a clean dishtowel soaked with vinegar and then put on a new lid. Tighten according to manufacturer's recommendations. At this point you are ready to can them. Process following your pressure canner's instructions. I pressure canned this stock at 11 pounds of pressure for 25 minutes and made 5 quarts of delicious turkey stock. Mark and date your jars and you are finished.

A few notes:
- You can use raw meat or cooked meat when making stock. You can even mix some of each. Since it is cooked for so long (simmering at least 12 hours) all the germs should be killed so it is safe to do so.
- Other than parsley, avoid using other green veggies. They end up making the stock taste bitter.
- If you prefer to add no veggies, that is fine too. The veggies add gorgeous color, some flavor and extra vitamins and nutrients but you can make just bone broth if you prefer.
- You can use this basic recipe for chicken stock; beef stock and fish stock too. :-) The good thing about beef stock is that the beef bones can be reused 3-4 times to make stock over and over. After making beef stock, dump out the veggies and can your stock and then add the bones to a pot again, add in the vinegar and start the process over again.
It flavors soups or my Southern Cornbread Dressing very well.
Follow us on Pinterest
Follow us on Twitter
Follow our Youtube Channel
Follow us on Instagram


