A blog about the simple life. Homesteading. Frugal living. Self-sufficient. Sustainability. Homeschooling. Farm Life. Cooking. Canning. Baking. Recipes. Tips & Tricks. Family Life. You will also find tips on prepping and becoming a prepper. We our proud of our Christian faith and will make posts accordingly. Product Reviews! As seen on Extreme Cheapskates!
Monday, December 24, 2012
Monday, December 10, 2012
Take a Walk with Me...
Yesterday was a beautiful day here in SE Oklahoma and the boys and I decided to take a little walk around the property. I took the camera with me and took pictures of things that interested me. Hope you enjoy them.
I know it shows a lot of bare trees but I think trees in the winter months have beauty in them also. I hope you enjoyed the pictures. I appreciate you all.

 |
| Sunset through the trees |
 |
| Black birds circling above |
 |
| My 14 year old and this big Cedar tree. It would make a gorgeous Christmas tree. Perhaps we should try to decorate it next year. |
 |
| Just another pretty view |
 |
| Yes, this is just a picture of dead leaves but isn't it calming to look at?! |
 |
| Yes, it was this warm yesterday here in SE Oklahoma in December. This is a view of part of our private road leading to our home. |
 |
| Our beautiful watch dog Sheera. She is so great with our family but very protective of us and our property. |
 |
| Sheera again. |
 |
| Yes, Sheera again. I can't help it, we think she is so pretty and we love her so much! |
 |
| Another view of the sunset. |
 |
| Another Cedar tree. This one is much taller than the other one but not as "fluffy". :-) |
 |
| I love how these trees are "merged" together. |
 |
| The view off of my front porch looking over the shed. |
Follow us on Facebook
Follow us on Twitter
Follow us on Pinterest
Another blog you might like:
The Chicken Chick
Create with Joy
The Better Mom
Another blog you might like:
The Chicken Chick
Create with Joy
The Better Mom
Tuesday, December 4, 2012
Homemade Reeses
This is one of my favorite candies to make. My husband who despises real "Reeses" and can't stand peanut butter and chocolate together actually loves these too. They are soooo good.
Set it in the refrigerator or freezer to harden. We stick ours in the freezer for 30 minutes because it hardens faster which means we can eat it sooner. :-) Once the top has harden, cut into serving pieces and enjoy.
Any pieces not eaten right away, place in the refrigerator to enjoy later.
Homemade Reeses
2 sticks butter
1/3 box of graham crackers
1/3 box of graham crackers
1 bag semi-sweet chocolate chips
First melt the margarine in the microwave.
Open up the box of graham crackers and remove one package from the box.
Crush up the package of graham cracker into really small crumbs. I usually do this before opening up the plastic. Pour the crushed package into the bowl of melted margarine.
Now get the peanut butter and measure out 1 cup and add it to the mixture.
I used creamy peanut butter this time but it is equally as good with crunchy peanut butter.
Now stir in the powdered sugar. Here is what it looked like after adding it in.
But since we have to pat it down by hand, we added a bit more until it looked like this:
Now, get out a cookie sheet and pour the mixture into it. Wash and dry your hands and begin patting it down firmly like so....
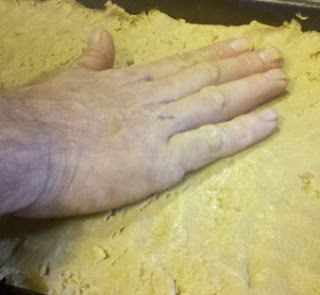 |
| My husband patting it down... |
In a clean and DRY bowl, pour in the chocolate chips.
Melt the chips in the microwave in 30 second bursts for the first minute and then for 15 second intervals. Stir in between times with a clean and DRY spoon. Once they are all melted, pour on top of the graham cracker mixture and smooth it out with a spatula.
 |
| The finished product. |
Any pieces not eaten right away, place in the refrigerator to enjoy later.
Be sure to try my Old Fashioned Potato Candy, Root Beer Float Fudge and my Chocolate Billionaires too!
Sunday, November 25, 2012
Turkey Breast in the Crock-Pot
With the holidays coming up, I thought I would tell you a simple way to cook a turkey breast in the crock-pot. This is a great time of year to pick up turkey breasts for a great price and here is a quick and easy way to cook them.
Serve this Turkey breast along side some homemade mashed potatoes, chicken and noodles, with some 30 minute whole wheat rolls! YUM!
Other Crockpot/Slow Cooker Recipes:
How to Cook a Perfect Roast Dinner in the Crock-pot
Complete Chicken Dinner in the Crock pot
Blogs that I have shared this post with include:
Saving 4 Six
The Self Sufficient HomeAcre
The Chicken Chick
Ducks 'n a Row
Olives 'n Okra
Turkey Breast in the Crock-Pot
Turkey breast
1 stick of butter
2 tsp. rosemary
2 tsp. sage
olive oil
2 cans chicken broth
1 1/2 tsp. sea salt
1 tsp. pepper
1 onion (yellow or white)
First, remove the neck, gizzards, and gravy packet from the turkey, if included. Rinse your turkey breast inside and out. Pat dry. Rub olive oil all over the turkey breast. Turn on your crock-pot to high. Spray the inside of the crock-pot with cooking spray and then put the breast inside the crock pot with the breast side down.
 |
| Place it breast side down. |
Pour in the cans of chicken broth. Sprinkle the breast with all your spices. Place the stick of butter in the cavity and then peel off a few layers of onions and place on and in the breast.
 |
| Seasoned and ready to cook. |
Serve this Turkey breast along side some homemade mashed potatoes, chicken and noodles, with some 30 minute whole wheat rolls! YUM!
Other Crockpot/Slow Cooker Recipes:
How to Cook a Perfect Roast Dinner in the Crock-pot
Complete Chicken Dinner in the Crock pot
Blogs that I have shared this post with include:
Saving 4 Six
The Self Sufficient HomeAcre
The Chicken Chick
Ducks 'n a Row
Olives 'n Okra
Tuesday, November 13, 2012
Perfect Crock-Pot Roast
I don't know about you, but one of my favorite meals is Roast, potatoes, and carrots. Our family likes it so much that we have it once a week, usually for Sunday Lunch. Growing up, my mother always cooked the roast in the oven but my preferred method is the crock-pot. I prepare everything and get it on right before we go to bed on Saturday night on low and it is ready for Sunday lunch.
Crock-Pot Roast & Fixin's
Roast (we prefer rump or arm roasts)
1 Onion (we prefer yellow or white)
potatoes (enough for your family)
carrots (enough for your family)
Salt & pepper, to taste
2 T. Worcestershire sauce
1 pkt. brown gravy mix
 |
| Rump roast |
Peel your potatoes and carrots. As you peel the potatoes, place them in a bowl full of water to prevent them from turning brown. Slice your potatoes. We like ours cut into fourths lengthwise but others prefer chunks.
Now, slice your carrots. We slice the carrots the same way we do the potatoes. Place the carrots and potatoes into the crock-pot. Lightly salt & pepper them. Add in 1/4 cup water. Place your roast on top of the vegetables. Open the gravy packet and pour on top of the roast and then pour the Worcestershire sauce over the gravy. It is okay if some of the dry gravy remains. As the roast cooks, it will liquify. Salt & pepper the roast. Finally, peel the onion and cut it in half. Take 3-4 outer layer sections and lay across the roast for flavor. Put the lid on the crock-pot and cook on low over night (8-10 hours). I have let mine cook up to 12 hours and it was still perfect.
If you like cooking meals in the crock pot, check these out too: Complete Chicken Dinner in the Crock Pot and Turkey Breast Cooked in the Crock Pot.
I shared this recipe idea on the following blogs:
Monday, November 12, 2012
Handprint Fall Art
We homeschool. No big surprise there but one great thing we love to do is arts and crafts. The absolute favorite kind of craft we do that I love the most are the ones done with hand and/or foot prints. I love looking at them over the years and see how much my boys have grown.
For this project, we began by tracing out my son's hand, wrist and forearm onto a brown sheet of construction paper. Then glue the cut-out hand/arm onto a plain piece of white paper. We just used typing paper. Then we put a squirt of red, green, and yellow finger paint onto a paper plate and let the kids have fun. Using their fingertips, they used green to make the grass across the bottom and to make leaves on the trees and falling to the ground. The did the same process for the leaves with the red and yellow. I love how the leaves are the fingerprints. How do you like it?
 |
| My 8 year old's creation. |
Sunday, November 11, 2012
Pumpkins: Treats for farm Animals
Our local grocery store gave us 5 pumpkins the other day so we could feed them to our animals.
They were just going to throw them away and they knew we would take them. Pumpkin is very good to feed to chickens. They love it and pumpkins are a natural wormer for chickens.
My boys had fun taking a rubber mallet to the pumpkins to break them up for the chickens.
Hubby wanted some of the fun too so he got out a machete and cut 2 of the pumpkins in half for the pigs.
If you have any left over cukes, gourds, squash or pumpkins, give me a call. We'll gladly take them. ;-)
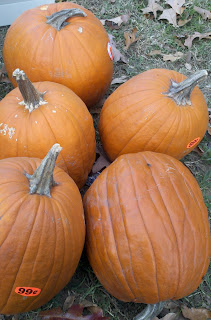 |
| The 5 free pumpkins we got. |
My boys had fun taking a rubber mallet to the pumpkins to break them up for the chickens.
 |
| One of the boys about to "whack" the pumpkin. |
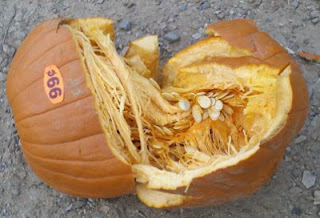 |
| A lot of good "meat" here for our chickens. |
 |
| Here he is positioning the 1st pumpkin "just so". |
 |
| What form!!! |
 |
| I know who to call if I need someone beheaded. lol |
We have 3 pens of chickens and 2 pigs so getting exactly 5 pumpkins really worked out for us.
 |
| Our Rooster, a white Polish chicken. |
 |
| I love her deep red color. |
 |
| Our Blue Silkie, one of our 1st chickens ever. |
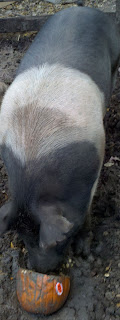 |
| "Pork Chop" enjoying his pumpkin. |
Subscribe to:
Comments (Atom)
Hello All!
Hello everybody. I hope everyone’s been doing OK. I know it’s been a bit since I’ve written. Most know that I’ve been on hospice care a...

-
I recently read another blog and the writer talked about frugal living and how their family of 6 lived off of $2200 a month. ...
-
I like having many kinds of "mix-in-a-jar" meals around. My goal is to have 365 of them made up, one for every day of the y...
-
I love easy and not much is easier than mixing up some mix-in-a-jar recipes. Not only do they make wonderful gifts but they are also ...


